Connect devices Locally
In the vast majority of cases you don't have to do anything special to connect your devices that share the same local network.
Just open EasyJoin in all your devices and wait a few seconds for them to connect to each other.
If the local network is divided into several sub-networks you can try to specify the IP of a device in the "Settings" section of each device.
The field to fill in is the one labeled "Internal network IP".
The field to fill in is the one labeled "Internal network IP".

Click the name of a device in the "Trusted" list and select the "Settings" tab
If you want to connect with a specific IP address you can use the "Ping IP" feature and write the IP you want to ping.
You can ping multiple IPs by replacing the last number of the IP with the "*" character, i.e. "192.168.1.*" to ping all IPs of "192.168.1".

In the list of devices click on the icon at the top right to open the context menu and select "Ping IP"
Connect devices Directly via Internet
You can connect via the Internet, directly and without the mandatory use of external servers, with all devices in the "Trusted" list.
To activate this feature you have to enable the "UPnP" on the modem/router
and, from the side menu, enable the "Direct connection via Internet" and "Share with trusted devices".
To activate this feature on your device, you must enable the "Direct connection via Internet" switch in the side menu.
The application will try to configure your modem/router so that it can "listen" to connection requests from external devices. In order to configure the modem/router, the "UPnP" functionality must be enabled in the router.
The application will try to configure your modem/router so that it can "listen" to connection requests from external devices. In order to configure the modem/router, the "UPnP" functionality must be enabled in the router.
Once the UPnP configuration is successful, your Internet IP and listening port will be displayed under the switch.

Switch to enable/disable the direct connection via Internet
If the "Share with trusted devices" switch is enabled, the Internet IP and port will be sent to the easyjoin.net server and will be available to trusted devices.
The data are sent to the server via an HTTPS protected connection and are also encrypted end-to-end.

Share your Internet IP and port with trusted devices
To connect to a "Trusted" device via the Internet you need to set some data in the "Settings" of this device.
You can skip this step if the remote device has "Share with trusted devices" enabled.
Internet IP / Host: In this field you must enter the Internet IP of the remote device. You may also enter a "host" name provided by one of the various services offering "Dynamic DNS".
Port: This is the port number that has been set in the "Settings" of the remote device.
Extended scan: By enabling this setting it is possible to search for the remote device also on the following ports from the one indicated above. This is useful when you are not sure if the remote device "listens" on the port indicated in the previous step.

Click the name of a device in the "Trusted" list and select the "Settings" tab
The last optional step is to indicate the listening port of your device(s).
To make multiple devices of the same local network visible on the Internet, you can indicate different listening port numbers in the "Settings".
If you leave the same default port (51167) for all devices the application will come to your assistance and will automatically set the first free port starting from the set one. A notification will inform you what port number is set.

Open the side menu by clicking on the icon

Depending on the outcome of the UPnP configuration it will be possible to connect the devices in "H2H" or "E2H" mode; the two modes are explained below.
As always, end-to-end encryption is used when transferring files, making voice calls, sending messages, sharing notifications, clipboard and other personal data.
As always, end-to-end encryption is used when transferring files, making voice calls, sending messages, sharing notifications, clipboard and other personal data.
H2H Connection
I named this connection "Home to Home" (H2H) because, usually, only on a home network it will be possible for the application to make the necessary configurations to the modem/router to enable this type of connection.
Once the UPnP configuration is successful, your Internet IP and listening port will be displayed under the switch.
Now you are ready to connect directly with other devices that have also activated "Direct connection via Internet" whether they have successfully configured their modem/router ("H2H") as well as in "E2H" mode.
Now you are ready to connect directly with other devices that have also activated "Direct connection via Internet" whether they have successfully configured their modem/router ("H2H") as well as in "E2H" mode.
Direct Internet connection is enabled and the modem/router has been successfully configured
TIP : to automatically share your Internet IP and port with "Trusted" devices, enable the "Share with trusted devices" switch.
E2H Connection
"Everywhere to Home" (E2H) is when you want to connect a device that cannot configure its modem/router, because it uses the Internet connection provided at the workplace, a public WiFi or mobile data, to a device that has successfully configured the UPnP of its modem/router.
In this case it will not be possible to configure the UPnP and the corresponding message will be displayed.
This will not prevent the application from attempting to connect with those "Trusted" devices for which it has their IP or host name available.
When operating in this mode, it will be the device that cannot configure its modem/router to initialize the connection with other devices.
When operating in this mode, it will be the device that cannot configure its modem/router to initialize the connection with other devices.

Direct Internet connection is enabled but it is not possible to configure the modem/router
Devices Management
All devices that are part of the same local network are initially displayed in the "Temporary" list.
To move a device from the "Temporary" list to the "Trusted" list, click on the device name (on the phone) or the "star" icon (on the computer).
To add a remote device, via Internet, in the "Trusted" list you can use the "Add a remote device" functionality.
To move a device from the "Temporary" list to the "Trusted" list, click on the device name (on the phone) or the "star" icon (on the computer).
To add a remote device, via Internet, in the "Trusted" list you can use the "Add a remote device" functionality.
"Trusted" vs "Temporary" devices
The distinction between "Trusted" and "Temporary" devices is a logical distinction that allows you to choose group settings based on the "trust" level of the devices.
For example, you can select to remain invisible to all "Temporary" devices by just clicking on the corresponding setting on the "Settings" page.
To enable and manage advanced features on your devices, you need to move them to the "Trusted" list. To move a device from the "Temporary" list to the "Trusted" list, click on the device name (on the phone) or the "star" icon (on the computer).
To enable and manage advanced features on your devices, you need to move them to the "Trusted" list. To move a device from the "Temporary" list to the "Trusted" list, click on the device name (on the phone) or the "star" icon (on the computer).
"Trusted" device
Click on the device name to open a page dedicated to this device. In this page you can see the exchanged P2P messages, its notifications,
its SMS and MMS, remote control the device and manage its settings.
Some of the features are only available in the "Pro" / premium version.
Some of the features are only available in the "Pro" / premium version.

Device related functionalities
In the settings you can change the name of the remote device.
You can also set to be notified when the battery charge exceeds and/or falls below a certain level.
You can also set to be notified when the battery charge exceeds and/or falls below a certain level.

Manage the name of the remote device and the battery charge alert
You can set what features you want to enable and what kind of information to exchange with the device.
Depending on the functionality you enable the application may require additional permissions to provide them.
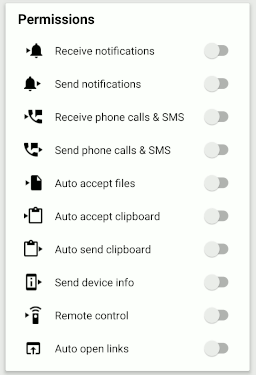
Manage device permissions
Add a remote device
To add a remote device, which is not in the local network, in the "Trusted" list, click on the icon in the top right corner of the device list to open the context menu and select "Add remote device".
Menu item "Add remote device"
In the page that will open you will find your "Connection ID" that you must send to the remote device. You have to set the "Connection ID"
that the remote device has sent you and then click the "Add device" button to start the process.
The application uses the easyjoin.net server to connect devices via an HTTPS protected connection. The data exchanged by the devices are also encrypted end-to-end.
Once the devices add each other to the "Trusted" list the easyjoin.net server is no longer used and communication between them is direct.

"Add remote device" page